Are you a DIY weapons enthusiast wishing to further your skills? If so, you’ve heard about 80% lower receivers and their unique possibility for customizing your rifle. Machining an 80% lower receiver may seem difficult, but it’s a doable and satisfying endeavor with the correct equipment and advice.
In this blog article, we’ll guide you through milling an 80% lower using a drill press, a common and inexpensive instrument that may help you turn a raw block of metal or polymer into a working basis for your dream gun.
Before we get started, it’s crucial to remember that although completing an 80% lower is permissible in most places, you should always verify your local and state legislation to guarantee compliance. Furthermore, remember that safety should always come first while dealing with guns or equipment. Let’s learn how to mill an 80% lower with a drill press like a genuine American DIY gunsmith!
Tools and materials required:
 You’ll need the correct equipment and supplies to grind an 80% lower using a drill press. Getting things ready will help the process go more smoothly and efficiently. Here is a list of the necessary equipment and supplies to get started:
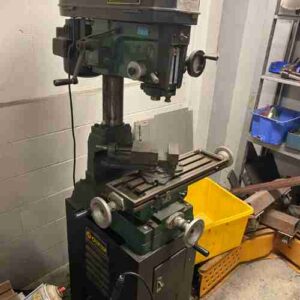
- Drill press: The backbone of this project is a dependable and steady drill press. Choose one with sufficient power and accuracy to handle the milling procedure.
- Vise: A solid vise is required to keep the 80% lower in place while working. To safeguard your lower from harm, utilize a vice built for 80% lowers or a conventional bench vise with soft jaw inserts.
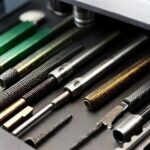
- End mills: High-quality end mills are essential for correctly and effectively removing material. You’ll need a range of sizes to obtain the appropriate results, including 3/8-inch and 1/4-inch end mills.
- Drill bits: A collection of sharp drill bits of different sizes is required to drill pilot holes and pinholes. To achieve clean, accurate results, use metal-working bits.
- Lubricant: Using lubrication or cutting fluid can assist in decreasing heat buildup and increase the life of your cutting instruments. Choose a lubricant made exclusively for metal machining.
- Personal protective equipment, such as safety glasses, hearing protection, and gloves, are essential for your safety throughout milling.
Selecting the appropriate 80% lower:
- Material options: 80% of lowers come in various materials, including aluminum, steel, and polymer. When selecting, consider the benefits and drawbacks of each material and the exact handgun construction you have in mind.
- Compatibility with intended weapon build: Verify that the 80% lower you choose is compatible with your preferred firearm platform, such as an AR-15 or an AR-308. Consider any alterations you want to make.
Optional tools suggested:
- A digital caliper may help you precisely measure the size of your machined pocket and pin holes, assuring a perfect fit with the other weapon components.
- A deburring tool is excellent for cleaning out rough edges and burrs left over after milling, resulting in a more polished and professional look.
- Finishing solution or touch-up paint: Putting a finishing solution or touch-up paint to your finished 80% lower may help preserve it from corrosion and improve its overall look.
Organizing Your Workspace:
Before grinding your 80% lower, you must create a clean, tidy, and safe environment. This would not only improve efficiency but will also assist in avoiding accidents and blunders. These are some important things to think about while setting up your workspace:
A. The significance of a clean and well-organized worksite
A clean, well-organized workplace will assist you in remaining focused and productive during the milling process. Clear your workspace of any unneeded stuff and keep all of your equipment and supplies close at hand. Moreover, make sure that your workplace is well-lit so that you can work with precision and accuracy.
B. Secure your 80% lower in the vise properly.
Securing your 80% lower receiver in a vice is critical to guarantee stability and control throughout the milling operation. Use a vise made particularly for 80% lowers or a conventional bench vice with soft jaw inserts to prevent your lower from harm. While clamping the bottom, ensure it’s level and secure without overtightening the vise, which might deform or damage it.
C. Drill press alignment and leveling
- Accurate milling requires proper alignment and leveling of your drill press. Adjust the drill press as needed to ensure it is correctly aligned and level, which will aid in mistake prevention and limit the danger of injuring your lower during the milling process. Before working on your 80% lower, use a machinist square or similar accurate measuring equipment to verify the drill press for squareness and levelness.
- Setting up a clean, organized, and well-prepared workplace will help you succeed while you grind your 80% lower using a drill press.
 Milling the Pocket of the Fire Control Group:
One of the most important components of finishing your 80% lower is milling the Fire Control Group (FCG) pocket. This procedure entails making a cavity in the lower receiver to hold the trigger, hammer, and other necessary components. To obtain a precise and accurate FCG pocket, follow these steps:
1. Pilot hole drilling
Selecting the correct drill bit size: Choose a drill bit corresponding to the recommended size for your 80% lower jig. This ensures precise hole placement and seamless transitions between milling runs.
Determining hole placement: Mark the necessary positions for pilot holes using the instructions included with the 80% lower jig. These holes will function as milling guides, ensuring precise depth and alignment.
2. End milling for rough milling
Progressive material removal: Begin by removing most of the material from the FCG pocket using a bigger end mill, such as a 3/8-inch end mill. Mill in shallow passes, increasing the depth progressively with each pass. This approach will aid in the prevention of tool breakage, the reduction of heat accumulation, and the maintenance of control throughout the operation.
Smooth transitions between passes: During milling, smooth transitions prevent uneven surfaces or gouges in the FCG pocket. Using lubrication regularly will assist in maintaining clean cuts and reduce tool wear.
3. Final passes and edge cleaning
- After removing the bulk of the material from the FCG pocket, use a smaller end mill, such as a 1/4-inch end mill, to fine-tune the form and size of the pocket. This will help you to obtain clean and exact edges, as well as proportions that are appropriate for your individual handgun construction.
- Obtaining clean and equal edges: Pay particular attention to the edges of the FCG pocket as you perform the final passes. Make sure they’re clean, even, and free of burrs or other flaws that might interfere with the operation of your rifle.
Making Pin Holes:
Drilling pin holes in your 80% lower is important in making a working handgun. These holes accept the pins that secure the fire control group and other components. Precise pinhole placement is critical for optimum performance and dependability for your custom firearm. To guarantee that the pin holes are successfully drilled, follow these steps:
1. The significance of accuracy and alignment
When drilling pin holes in your 80% lower, precision and alignment is critical. Misaligned or incorrectly placed holes might cause malfunctions or even dangerous circumstances in your finished handgun. To obtain the finest possible outcomes, take your time, measure properly, and double-check your work.
2. Utilizing the proper drill bit sizes
Choose drill bits that match the required sizes for your 80% lower jig. The proper drill bit sizes will allow you to create clean, accurate holes containing the essential pins without undue play or interference.
3. Correct drilling technique for precise pin holes
- Begin by making a dimple with a center punch or a tiny drill bit at each pinhole position designated by your jig. This will assist in guiding the drill bit and preventing it from straying when drilling the holes.
- Before drilling, apply cutting fluid or lubricant to the drill bit and hole site. This will aid in heat reduction and smoother drilling.
- Drill each pinhole slowly and carefully with your 80% lower clamped in the vise and aligned with the drill press. Excessive pressure or rapid drilling might cause the bit to stray or shatter.
- Clear away chips and debris as you drill to preserve vision and minimize heat buildup. Lubricant should be used to maintain the drilling process smoothly and efficiently.
- Use a deburring tool or fine-grit sandpaper to remove any burrs or rough edges that may interfere with the fit and operation of the pins and components after drilling each pinhole.
Final Touches and Assembly:
After milling the Fire Control Group pocket and drilling the pin holes, it’s time to complete your 80% lower and join it with the other weapon components. To finish your creation and bring your personalized handgun to life, follow these steps:
1. Checking the quality and safety of your job
Inspect your finished 80% lower for evidence of damage, uneven surfaces, or other flaws that might compromise the performance and safety of your handgun. Before proceeding with the assembly, address any difficulties that you discover.
2. Deburring the edges and smoothing off any rough spots
Remove any burrs or rough edges left by the milling and drilling procedures using a deburring tool or fine-grit sandpaper. This not only improves the aesthetic of your final lower, but it also ensures smooth operation and good component fitting.
3. Using a finishing product or touch-up paint
Consider using a finishing solution or touch-up paint to preserve your 80% lower against corrosion and improve its overall look. Choose a finish compatible with your lower material and follow the manufacturer’s application instructions. Let the finish fully cure before beginning assembly.
4. Combining the finished lower with additional weapon parts
You may combine your 80% completed and inspected lower with the other components needed for your custom weapon assembly. Installing the firing control group, buffer tube assembly, pistol grip, stock or brace, and mating the finished lower receiver with an upper receiver is normal. Before declaring your project finished, ensure all elements fit together correctly and perform smoothly.
Frequently Asked Questions (FAQs)
What is an 80% lower receiver?
An 80% lower receiver is a partially completed firearm component that requires additional machining and finishing to become a functional lower receiver for a custom weapon. It is called “80%” because it is approximately 80% completed, with the remaining 20% requiring the user’s input and customization.
Is it legal to mill an 80% lower receiver?
In most places, it is legal to mill an 80% lower receiver for personal use, as long as you adhere to local and state laws. However, it is essential to verify your specific location’s legislation and ensure compliance with all applicable regulations before attempting to mill an 80% lower receiver.
Do I need a specific type of drill press to mill an 80% lower receiver?
While a specific type of drill press is not required, it is essential to use a dependable and steady drill press with sufficient power and accuracy to handle the milling process. Investing in a high-quality drill press will ensure better results and a smoother experience when milling an 80% lower receiver.
What material should I choose for my 80% lower receiver?
80% lower receivers are available in various materials, including aluminum, steel, and polymer. Each material has its benefits and drawbacks, so consider your intended firearm build and personal preferences when choosing a material for your 80% lower receiver.
Can I use regular drill bits for milling an 80% lower receiver?
It is recommended to use metal-working drill bits when milling an 80% lower receiver. These bits are specifically designed for cutting through metal and will provide cleaner, more accurate results than regular drill bits.
What if I make a mistake while milling my 80% lower receiver?
Mistakes can happen, especially for beginners. If you make a mistake while milling your 80% lower receiver, assess the severity of the error and determine whether it can be fixed or if you need to start over with a new 80% lower. Always prioritize safety and proper functioning when assessing mistakes and deciding how to proceed.
Last words:
In this blog article, we’ve led you through milling an 80% lower with a drill press, from setting up your workstation to putting the finishing touches on your bespoke handgun. You’ve successfully converted a raw block of material into a working basis for your fantasy gun by following the step-by-step instructions.
With your finalized 80% lower in hand, your modification and experimentation options are nearly infinite. As a DIY gun enthusiast, you should always emphasize safety and legal compliance to maintain responsible weapon ownership and pleasure.

We hope you found this book both educational and entertaining and that it inspired you to experiment with new methods to customize your weapons and extend your understanding of gunsmithing skills. Congrats on your achievement, and welcome to the thrilling realm of custom handgun construction!
- Where are WEN drill presses made? - April 2, 2023
- Where are Rikon drill presses made? - April 1, 2023
- Where are Powermatic drill presses made? - April 1, 2023