Have you ever wanted to create something unique and personal, like crafting your custom pen? Pen turning is an engaging and satisfying hobby, but it can seem daunting when you don’t have all the fancy tools like a drill press.
Fear not, my fellow artisans! In this guide, we’ll show you how to drill a pen blank without a drill press, using only a handheld power drill and a few simple techniques. With some patience and practice, you’ll be on your way to creating beautiful, handcrafted pens that you can proudly display or gift to your loved ones.
Let’s dive right in and demystify the process of drilling pen blanks, even if a drill press isn’t part of your workshop arsenal!
 Required Tools and Materials:
- Pen blank: Select an appropriate material, such as wood or acrylic, for the pen blank.
- Pen kit: This usually consists of pen tubes, nibs, clips, and other essential components.
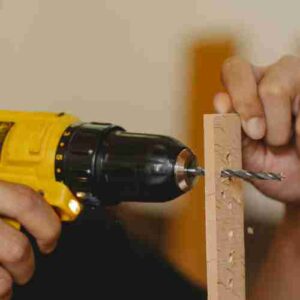
- Handheld power drill: For drilling the hole in the pen blank, use a handheld power drill.
- Drill bit: Choose the right size depending on the pen kit specifications.
- Pen blank vise or clamps: To secure the pen blank during drilling, use a vise or clamps.
- Center punch and hammer: To get a precise starting point for drilling, use a center punch and hammer.
- Ruler and pencil: To measure and mark the center of the pen blank, use a ruler and a pencil.
- Masking tape: This is used to designate the proper drilling depth on the drill bit.
- Safety gear: To protect yourself when drilling, use safety goggles, gloves, and a dust mask.
Preparing Your Pen Blank:
- Selecting the right size pen blank: Pick a pen blank slightly bigger than your pen’s final dimensions. This gives you leeway and allows you to cut and shape the blank as required.
- Marking the center of the blank: With a ruler and pencil, identify the precise center of the pen blank. To find the center point, draw diagonal lines from corner to corner. Here is where you will drill the hole for the pen tube.
- Creating an indentation for accurate drilling: Put the pen blank on a firm surface and make a tiny indentation at the center point you indicated with a center punch and hammer. As you start drilling, this will help guide the drill bit and keep it from drifting off course.
Setting Up Your Drilling Station:
- Secure the pen blank: To hold the pen blank on your workstation or table, use a pen blank vise or clamps. Ensure the blank is tightly grasped and steady, since any movement during the drilling process might result in an off-center hole.
- Align the pen blank with the drill bit: Place the pen blank such that the drill bit enters the previously produced center punch indentation. Examine the alignment from various angles to confirm that the bit is centered and will drill straight through the blank.
- Place masking tape on the drill bit to indicate proper drilling depth: Determine the length of the pen tube from your pen package and allow for a tiny margin of error (approximately 1/8 inch). Using masking tape, mark this measurement on your drill bit. This will allow you to determine when to stop drilling and avoid drilling through the blank.
Instructions: how to drill a pen blank without a drill press?
- Safety precautions before drilling: To protect yourself from debris and possible mishaps, always wear safety goggles, gloves, and a dust mask. Make sure your workspace is well-lit and clutter-free.
- Using a handheld power drill with steady pressure: Keep the power drill securely in place and begin drilling slowly and gently. Once the drill bit penetrates the pen blank, gradually raise the speed. To ensure a centered hole, keep the drill as straight and perpendicular to the blank as possible.
- Tips for maintaining a straight and centered hole: Stop drilling at regular intervals to verify the alignment of the hole from various perspectives. Adjust your drilling method if the hole looks to be deviating off-center. Practice and patience are crucial for achieving a straight hole without a drill press.
- Monitoring drilling depth to avoid drilling through the blank: Keep an eye on your drill bit’s masking tape marking. Stop drilling when the tape reaches the surface of the pen blank. This prevents you from drilling through the whole blank.
- Clearing chips and debris periodically: Pause now and then to clean away any chips or debris from the hole. This contributes to a clean and precise drilling operation.
Finishing the Drilled Pen Blank:
- Inspecting the hole for straightness and centering: Examine the drilled hole carefully to verify it is straight and correctly centered. You may need to make small modifications or start with a fresh blank if the hole is somewhat off-center or slanted. Always remember that practice makes perfect!
- Sanding and cleaning the hole, if necessary: If the hole’s interior has rough edges or dirt, use fine-grit sandpaper to sand it gently. This will aid in the smooth fit of the pen tube. After sanding, remove any dust or debris from the hole using a tiny brush or compressed air.
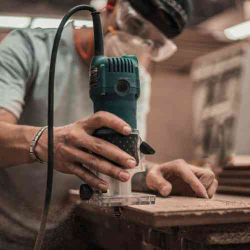
- Preparing the blank for the next steps in pen assembly: After the hole is clean and smooth, continue with the pen turning process by gluing the pen tube into the hole, reducing the blank to size, and shaping the pen. For a successful pen assembly, follow the instructions included with your pen kit.
Frequently Asked Questions (FAQs)
1. Can I use any type of wood or material for a pen blank?
You can use various materials for pen blanks, including wood, acrylic, and even stabilized materials. It’s essential to choose a material that is easy to work with and can withstand the drilling and turning process. Some popular wood choices include maple, walnut, and cocobolo, while acrylic blanks come in many colors and patterns.
2. What if my pen blank hole is slightly off-center or not perfectly straight?
If the hole is only slightly off-center or not perfectly straight, you may still be able to salvage the pen blank by making minor adjustments during the turning process. However, if the deviation is significant, it’s best to start with a new blank and practice your drilling technique. Remember, practice makes perfect!
3. How do I choose the right drill bit size for my pen kit?
The pen kit you purchase will typically come with specifications regarding the appropriate drill bit size. Ensure you use the correct size to match the pen tube and other components in the kit. If you’re unsure, consult the kit’s instructions or contact the manufacturer for guidance.
4. Can I use a cordless drill instead of a corded power drill?
Yes, you can use a cordless drill for drilling pen blanks. However, make sure it has enough power and torque to handle the material you’re working with. Additionally, ensure the drill’s battery is fully charged before starting the drilling process to avoid interruptions.
5. How do I prevent the drill bit from overheating during the drilling process?
To prevent overheating, drill at a moderate speed and apply steady pressure. Periodically pause to clear away chips and debris from the hole, allowing the drill bit to cool down. If necessary, you can also use a cutting lubricant to help reduce friction and heat generation.
6. Can I use this drilling method for other pen-turning projects?
Yes, this method can be applied to other pen-turning projects that require drilling a hole for a pen tube or similar component. The key is to adapt the technique to suit the specific requirements of your project, such as the material, pen kit components, and desired final design.
Final words:
Drilling a pen blank without a drill press is possible if the proper methods, equipment, and patience are used. You may manufacture stunning bespoke pens without specialist equipment by properly prepping your pen blank, setting up an efficient drilling station, and following the best techniques for drilling with a portable power drill.
Remember that practice makes perfect; learning from errors or problems can only benefit your pen-turning talents. Don’t be scared to try new things and tweak your approach as you acquire expertise.

We encourage you to share your experiences, successes, and tips with fellow pen-turners as we continue growing and learning in this satisfying and creative hobby. Happy pen turning!
- Where are WEN drill presses made? - April 2, 2023
- Where are Rikon drill presses made? - April 1, 2023
- Where are Powermatic drill presses made? - April 1, 2023